|
|
Bob's Shop Notes: |

|
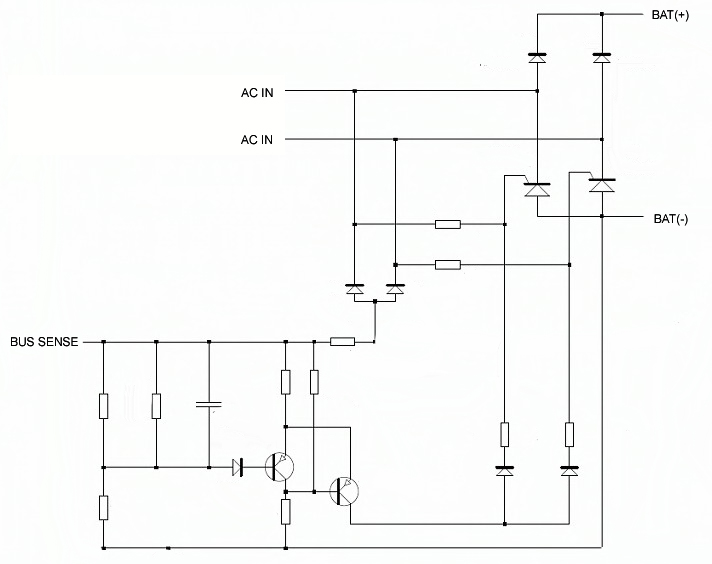
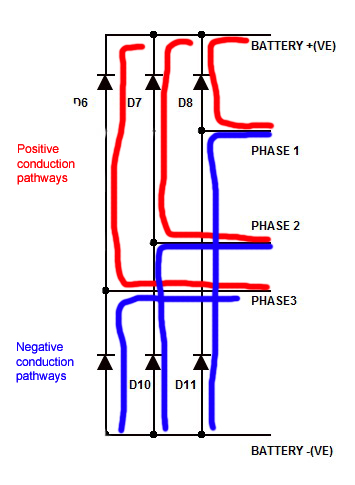
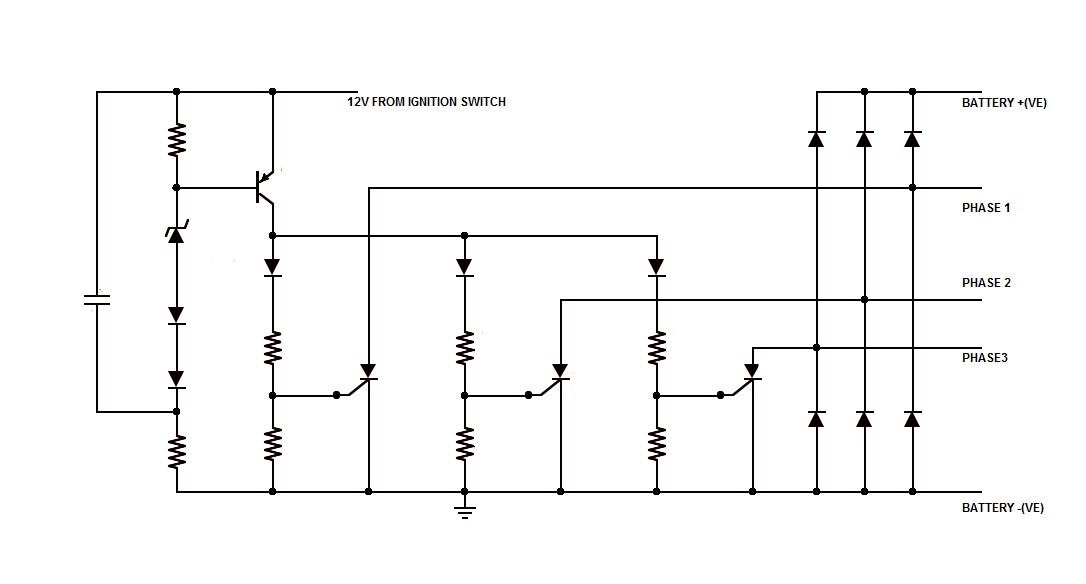
What's all this 'switching' stuff about? . . .Let us first define some terms common to the rectifier/regulator technology to arrive at a better understanding. The term 'switching regulator' is often applied to PM rectifier/regulators which is not incorrect . . . but also not helpful in achieving operational understanding. ALL regulators have solid state devices that function in one kind of 'switching' function. This article proposed to differentiate how those switches are arranged into two common topologies. alternator installations. Early in this thread, a writer expressed some confusion arising from his search for sources on 'switching regulators' . . . seems those little bits of plastic with a few connections coming out of them were not applicable to managing the energy available from an PM alternator . . . He's right. In the broader world of electron herding, SWITCHMODE regulators describe a class of devices common to electronic energy management devices found in virtually all consumer products. Things like the little 'wall warts' that quick-charge our mobile phones up to sine-wave, DC to AC inverters that might manage thousand of watts . . . and everything in between. They are the core technology of step-up, step-down converters and power suplies in our computers with 'switching' frequencies on the order of tens of thousands of Hz and higher. |
Step 2 . . .Strip the ends of each wire to be soldered into the connector. Use solder cups on connector as depth gage to see how much insulation you want to remove. When the wire is properly exposed, a wire bottomed out in the solder cup will have approx 0.030" gap between the end of the solder cup and the insulation. |
|
|
Step 3 . . .Now, we "tin" the exposed strands of wire. "Sparingly" is the keyword when applying solder. Just enough to turn your stranded wire into a solid wire. If the wire is not super clean you may have some trouble getting the solder to flow, add more solder (the additional flux and flow of molten solder past the strands helps flush away contamination that inhibits good solder adhesion) and shake off the excess solder immediately after you remove the heat. The goal is to look like the example I show in this photo. . . . If you're going to cover the finished joints with heatshrink, now is the time to put pieces (0.5 to 0.7" long) onto the prepared wires . . . |
Step 4 . . .Now partially fill each solder cup on the connector with solder. With .032" solder, you just stick the end of the solder strand into the cup, hit it with the iron so that the solder already inside the cup is melted and you don't feed any additional solder into the cavity. We don't want to fill it up; just coat the inside surface of the cup with fresh solder. |
|

|
Step 5 . . .The iron should have a tiny amount of liquid solder between the tip and the wire to get good heat transfer. Wipe the tip on a damp cellulose sponge and melt the smallest possible amount of solder onto the tip from your roll of 0.032" solder. Insert the end of the tinned conductor into the partially filled solder cup (make sure it's the wire you want to put on this pin! . . . soldered connectors are not difficult to rework but it is more fuss than with crimp on pins which are easily removed). Hold the wire in a manner that if the cup were not partially filled, the wire would slip inside and bottom out in the cup. When the joint gets to the right temperature, the wire will simply fall into place fully seated in the solder cup. If you have the minimum solder on the tip and enough temperature, this will happen very quickly . . . two seconds or less is typical. As soon as the wire hits bottom, remove the heat and hold the joint until the solder solidifies. Repeat this process with each of the remaining wires.
|
Step 6 . . .Here's what it should look like when you've finished the joint. If you're using heatshrink, slide the covers down over the finished joints. Apply heat to bring the shrink down to finished size. Note: heatshrink gets smaller both in diameter and length. If you use LONG covers (like an 1" or more) it's likely that you'll get some pull-back on one or more covers that leaves a gap between the end of the shrink and the connector body. Coax them down toward the connector as shrinking progresses.
|
|